Having prior experience in 3D will be easier for those who wish to do this guide, but if you have no experience, I’ll explain as easy as possible – I’ll split this guide into 3 parts.
REMEMBER – if this is your first time exploring some new software that you’ve never used before – the answer is to just google what you’re trying to achieve…. I’ll highlight points to search on at each stage for those unfamiliar.
To create a realistic avatar of yourself you will need to download and install a few software applications. The way the process works is;
For this step you need a smart phone to take pictures of your face, there are many different phone apps that can scan your face, for this demo I would suggest you use Polycam 3D. or any other device app software that allows you to export a 3D model.
The idea is to cover the frontal part of your head (Image 001 - Left), and DON’T smile – keep a neutral facial expression – also don’t worry about your hair. Use the app to take photos or LIDAR scan your face (LIDAR is available for some of the more recent phone models) – you only need to scan your face (see image above not the hair) – the app allows export to GLB file format for free from your phone you transfer the 3D file to PC.
With your face now scanned, export it to your computer (easiest way is to email the file to yourself from your device) – if you used the Polycam app you can export it for free using the GLB file format. Which you can open using another FREE software named Blender through which you’ll use to clean up the model.
If you have no experience using 3D software it can be quite daunting to use but remember the aim here is to take small steps – only do the task needed to be done then STOP. This is the best way to approach learning new software, you learn in small increments by not biting off more than you can chew, there are plenty of Youtube videos on specific tasks in software.
For the new user you only need to navigate around the software, rotating the view to see your model and then selecting the component of the model to clean (delete in this case). I’m not a blender user but for this demonstration – I’ll try using blender.
For my model I didn’t want to scan my face so I’ve used another method to get my actor (Image 002 - Right). You can head over to https://www.3d.sk/ - also it’s NSFW (artistic nudes – for photogrammetry purposes) - there are also some scans there to download and you could use that for your testing purposes, this model does have a scan but costs $$$, so I'll use other software to read the images to make my 3D model.
Despite being myself unfamiliar with Blender, it’s best to focus on the task at hand and identify the steps involved.
Step 1 (Image 003 - Right)– Import GLB file – FILE > IMPORT > glTF (*.glb / *.gltf
By default, Blender creates a cube is in the scene, you can select the cube from the list on the right side and delete that model.
You should have your model in the scene and should look something like to the right (Image 004).
As you can see from my demo model, the way that I’ve captured using the photoset of this model missed a side of her head, plus the model is not centered within the 3D environment.
(Where the Green and Red Lines intersect).
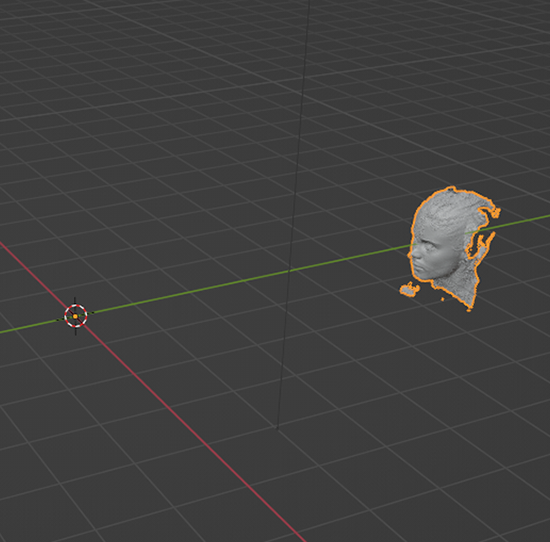
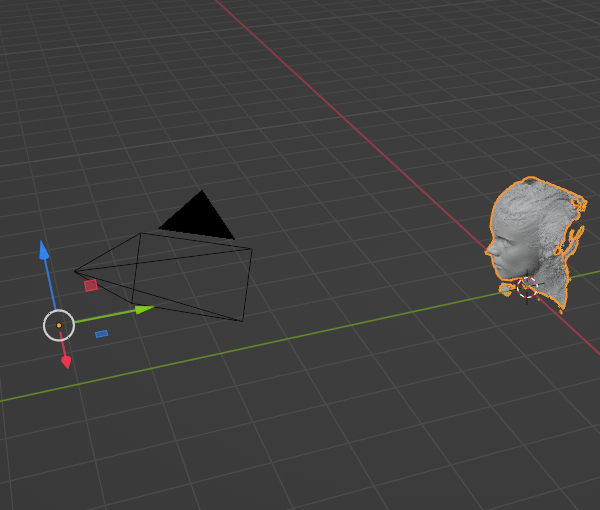
Now the fun part. First move the model to the center – the place where the green and red lines intersect. We need to position the model in the scene first so that later when we export into other 3D software it will be positioned in the center of that software as well. Press the 3rd button down in the tool bar. The one that looks like 4 arrows pointing out. (Image 005 - Below)
You’ll see a manipulator type tool (multicolored arrow) appear in the scene – drag the arrows and it moves your object around the whole scene. We will make the manipulator centre within the head shortly for now move it so it’s center and move the head up above the grid as pictured, head sitting above the intersecting lines. (Image 006 - Right Top)
To center the manipulator to the center of the object – select the head model.
You should be in the Layout Menu by default.
Go to OBJECT > SET ORIGIN > ORIGIN to CENTER of MASS (VOLUME) - (Image 007 - Right Bottom)
And you’ll notice that the manipulator is now in the center of the object.
To navigate around Blender play around with a few mouse and keyboard combinations so you get a feel for how to rotate and zoom in and out of your model.
Practice that until you are comfortable that you can quickly zoom in and out on different areas of the model – don’t feel the need to rush this guide – take some time to be able to move around in 3D Space, especially if you’ve never worked in a 3D Environment before.
For clean up we need to switch to ‘Edit Mode’ – at the moment you will see in the top left corner we are in Object mode – so from the drop down list – select editing mode and then select the ‘faces’ selection type Image 008 Right – look at the top left corner).
So next to Editing Mode are 3 buttons – Faces Selection Mode is the 3rd button from the left. You’ll also notice that your object goes black when u change to editing mode – this all depends on how many ‘polygons’ your model has – switching over to the Polygon Selection mode alleviates this slightly.
I have around 950,000 polygons (triangles) making up this scan – so when it is in vertex mode (points mode) it has 3 times as many – so when my model is in vertex mode at the start all I see is black because each vertex or point is represented by a black dot and there are nearly 3 million of them.
It also is good to note that a high amount of polygons will slow down your PC – if you used the polycam app it is unlikely you will have such a high polygon count.
Deleting faces now is very straightforward – you can click and drag to select polygons and press the delete key to delete. Remember to make sure you haven’t selected faces you don’t want to delete.
You can select portion by portion – even pressing and holding SHIFT while dragging will ADD to your current selection – pressing and holding CTRL will delete your selection.
Navigate by rotating around your mesh until your cleanup is complete (see Image 001) I will delete the unwanted faces to match Image 001 at the start of this guide.
When you select them and press the ‘Del’ key another box may open up – you want to delete faces. Keep at it until you finish, until it looks something like (Image 009 - Right)
To finish off part 1 of this guide we need to export this file to FBX format so we can open the file in Unreal Engine. This is the same step as Step 1, except we want to Export then choose FBX.
FILE > EXPORT > FBX (Now a dialogue box opens – you will need to choose some settings here)Change the following;
Check these settings against (Image 010 – Right) Save your FBX file, typically I create an FBX folder.
That’s it for part 1 – it is quite involved for those who are not familiar with 3D software – take your time and explore. The next step is to bring into Unreal Engine 5.0 so keep an eye out for Part 2 of this guide.