Moving onto Part 2 of our creation guide. For those who are new to the world of 3D, hopefully you've managed to learn something new and gain some insight to the process.
REMEMBER – Again this takes time to learn, years of fine tuning, as I write this I've been doing 3D for nearly 20 years, and it has been a perpetual cycle of investing time in different aspects of 3D software. From starting with modeling to textures/shading, then lighting, animation, rendering and dynamic simulation.
THE SHIFT - Now we are seeing a shift to scanning objects, real time rendering, automation and AI - so alot will change moving forward. This is the reason why even a novice can create photorealistic 3D.
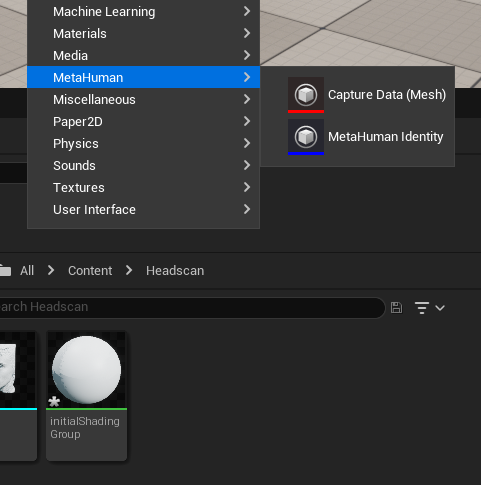
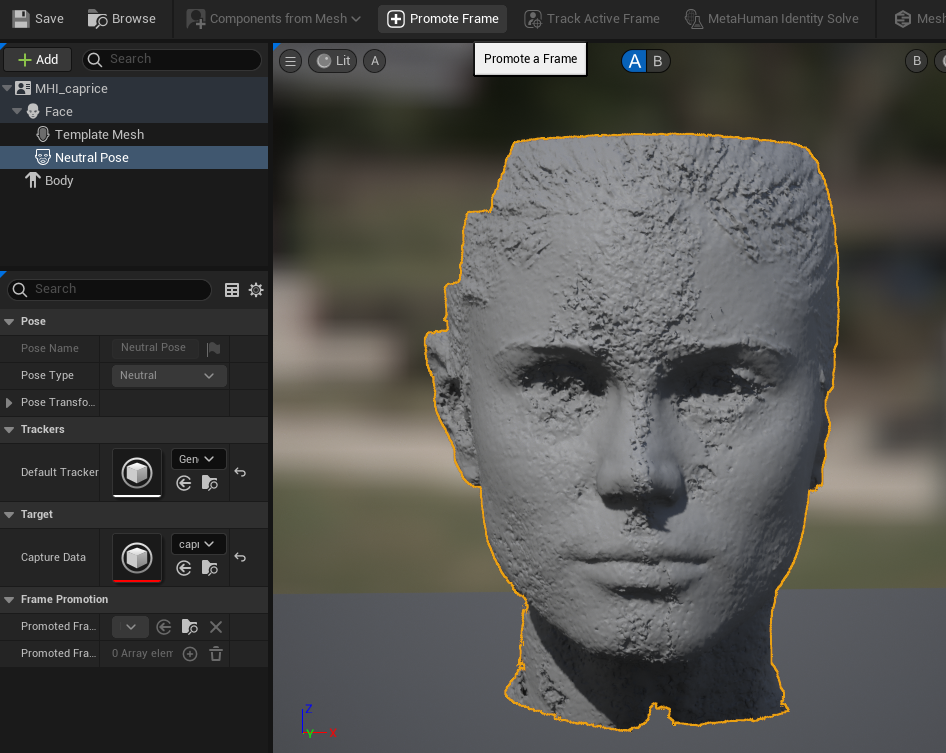
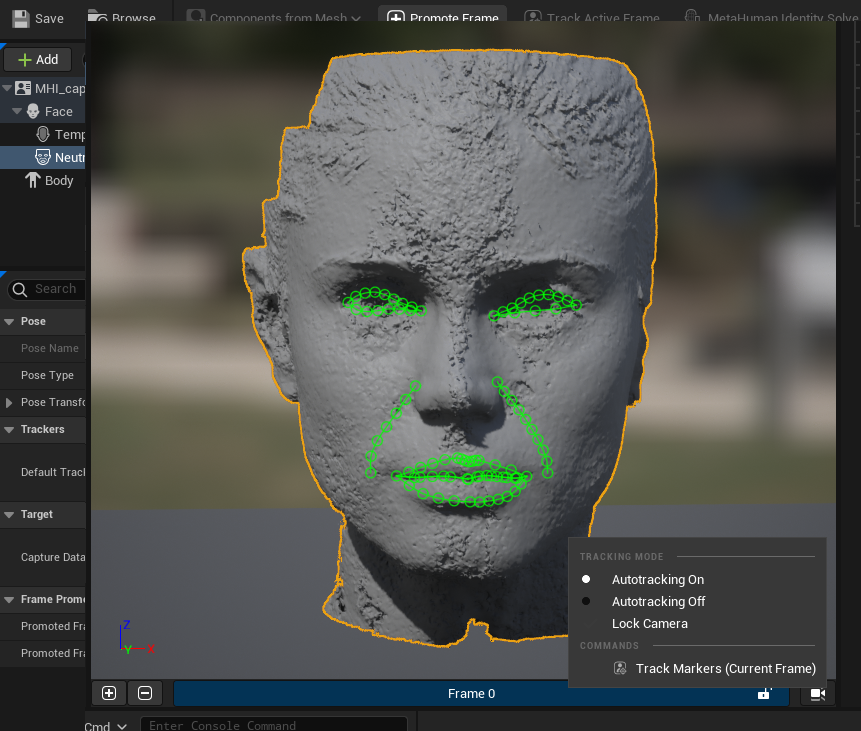
The next step you’ll need to do first is install Unreal Engine 5.0 on your computer, go to www.epicgames.com and register for an account, sign in and download the epic games launcher application.
It does take some time to download and install, so be sure to have sufficient HDD space for your application and the many projects you’ll create. Projects can get into the hundreds of gigabytes from the amount of 3d models you import into your scenes.
Once you’ve installed launch Unreal Engine. You should be able to navigate to starting a new project –the ‘Games’ or the ‘Film / Video and Live Events’ sections have good blank scenes to use – just different lighting.
Select one of those, also you’ll note the project path – you’ll need to be well aware of your HDD space and where you are saving your data from now on. I’ve made a new ‘customMetahuman’ folder on my D Drive – with the project name labeled as "caprice" (named after the model from 3dsk), (Image 011 - Right).
I prefer to use raytraced lighting for shadows, but you can turn it off if you like. Pressing create prompted me to update my nVidia graphics drivers so I will update but take note of the previous version I was using incase I need to roll back if I have any issues rising from installation of new graphics drivers. Running this for the first time will take time for Unreal Engine to process shader libraries, this is normal.
Your file structure will look like the following (Image 012 - Right)
It’s key to point out that from here, all your assets should be within this folder structure. We will move out our scans into this folder structure. So I used the ‘Game’ blank, but that adds a scene with a few pieces of other models as seen (Image 013 - Right)
The easiest way to clear everything is to make a new level so select FILE > NEW LEVEL, then select Basic.(Image 014 - Right)
So now we have our blank scene (Image 015 - Right)
In the ‘Content’ folder, you’ll see I have a Starter Content subfolder, those are the assets in the scen from earlier, but now we organize our scans, make a subfolder and label it ‘Headscan’, put it ‘OUTSIDE’ of the Starter Content folder, your file folder hierarchy should look like (Image 016 - Right)
Open your file explorer in your computer and drag your FBX scan to this folder. You will get a prompt box about the FBX settings – you can select Import All.
You will see your scan appear as an icon in the folder you created – don’t worry if you got any error messages about the model, that’s quite typical you can close that message box.
You can then drag the headscan model into the scene file. (Image 017 - Right)
This is similar to blender and any other application – typically the keys to press to move, rotate around the viewport are Shift, CTRL and Alt keys.
Take some time to move around the view to learn how to navigate the space and practice accordingly. Alternatively, you can use the arrow keys, or hold down the right mouse button and use WASD like a first-person shooter.
Firstly save your scene and close your file - FILE > SAVE CURRENT LEVEL
I create a new folder called ‘Maps’ and save my level there, when I open my caprice project I can double-click the map to load in what we see here.
Close Unreal Engine down, we are now going to install a plugin - Remember the Epic Games Launcher? Find the Marketplace tab - we will download our plugin from there.
On the Marketplace tab – search for ‘MetaHuman’ – we are looking for the 'MetaHuman Plugin', its totally FREE so click and install.
Whenever you download plugins from the Marketplace you will need to close and reopen the engine - this is why I've already closed down Unreal Engine - typically plugins usually load in when starting up software.
With the scene now open again – EDIT > PLUGINS from the menu and search for Metahuman – you’ll have to enable the plugin to tell Unreal Engine to load this plugin from now on. Then restart Unreal Engine and load your project again.
Now that you've enabled this plugin - Unreal Engine will always start with this plugin enabled.
So now once you’re back up and loaded, when you right click in the ‘Content Drawer’ at the base of your screen you should now see ‘Metahumans’ appear as an item to add to your scene. (Image 018 - Right)
So for this next step you want to create a ‘Metahuman Identity’ asset – rename it to a descriptive name.
I have renamed mine to ‘MHI_caprice’ – double click to open it for a new window to appear. (Image 019 - Right)
You may get prompted to login – so use your epicgames account, and you want to ‘Allow’ epicgames to be associated with Metahumans.
Next you want to click the ‘Components from Mesh’ button found at the top, then select your scan model. (Image 020 - Right)
Your scan should now be shown as the asset within this Metahuman identity popup. (Image 021 - Right)
So a few minor setups to go through here. (Image 022 - Right)
In the top left you’ll see an icon with 3 horizontal bars – Change the Focus Selected to 20
The button to the right is the lighting – if you have a texture on your model – you can turn off the shadows by changing to ‘Unlit’ – If I do that my object goes completely bright gray - so at the moment I’m using the ‘Lit’ mode so u can see the shadows fill out the volume of my 3d scan model.
To the right of that You’ll see 'A|B' buttons – this is what you’ll use to compare the scan between the head we get from Metahuman.
Finally, look at your model from the centre and front in the viewport then select ‘Neutral Pose’. (Image 023 - Right)
Here I can ‘Promote Frame’ to help Unreal Engine track the eyes and mouth, at the base it will say ‘Frame 0’ you can rename this frame to anything you like, however for this guide I will leave the name – Right click and enable ‘Auto-Tracking’ – Unreal will then calculate where the Eyes, Mouth are (Image 024 - Right)
So now we are up to here – if you move your camera around the markers will follow the model. I’m not too happy with this at the moment – the eyes seem weird, it could be due to the roughness of my scan, or perhaps because my scan doesn’t have any textures on it – it could be that the tracking could take into account the textures on the model as part of it’s algorithm. But I’m thinking that even though I have no textures Metahuman will add later down the pipeline.
Press the ‘MetaHuman Identity Solve’ button at the top, right next to the ‘Promote Frame’ button
Now you can click on the ‘B’ button – located at the top which will switch to a Metahuman face version in the shape of your scan. (Video 001) - Right
The last step here is to select a body – so on the list left side you’ll see a body type for you to choose. Select an appropriate one that matches your scan, there is a height modifier for you to slide left and right, all this will be tweaked later within the Metahuman Interface.
With that selected, press the Mesh to Metahuman button at the top.
It will take awhile while it sends all the information to the Metahuman servers. Maybe around 15 minutes or so – you will get a message saying that your Metahuman is now available on your creator space.
Head over to https://metahuman.unrealengine.com/ and launch the latest MetaHuman Creator app, login with your epic games account if it prompts, you should see your recently made metahuman under 'My Metahumans'.
Ok so we’ll leave it there for this guide, it is quite involved to get something out there – especially for new 3D people, I hope this guide is helpful.
NOTE: I did get an error on failing to send to metahuman – but when I checked the website and the full model is there to edit and tweak so Part 3 will finish up this project.